Granite Gantry Rail Drilling Part 2
Posted by Jonathan Gee on Mar 01, 2022
TAKES LONGER TO DRILL ONE HOLE THAN IT DOES TO WRITE THIS ARTICLE
Drilling Granite for Mounting Rails
[Part 2]
Posted by Jonathan Gee, 1st March 2022
This is a privately funded project that frequently sees shortage of funds delaying progress, If you are enjoying this build diary and would like to contribute to the completion of this project and all the future guides and video journeys it would be gratefully received and spent directly on this project. Donate through PayPalMe Here...
Rail Mounting Hole Drilling Part 2
This was where the Radial Pillar Drill really came in useful. It has quite a long reach and i was able to complete numerous holes without having to move the granite around all over the place for each hole. I also means that i could place the granite gantry on a mobile workbench to make maneouvering easier when it was necessary.
After much deliberation of how to go about this, i settled on drilling and fixing one bolt in at the right height, then i could set the rail by using a selection of clamps and the rail bolt iself. I used some masking tape which i had to replace after the first hole because the water had peeled it off.
Obviously the accuracy of these hole positions is pretty darn critical. You do not get a lot of play in the rails counterbore, and as you increase the number of holes, any discrepancies in your deviation from exactly 80mm means that the play in the rail decreases. I actually spent ages on this process. After marking out, I began to gently score the hole position with the core drill. I would then remeasure to ensure i hadn't made a glaring error. If all was well I then continued to drill the hole 1~2mm deep. This process seemed to work very well as it is very easy then to reposition the drill head to fall into one of these pre-made grooves, and you don't get any dancing about of the cutting tip.
I used a simple digital magnetic level to set the core drill perpendicular to the granite surface. Theres no point struggling trying to lift the granite by a degree or two here or there, I just tweaked the radial drill to match the granite.
IAs you can see in the video the granite drills very slowly. I am clearing the drill more frequently than normal because the hand that is holding the camera, should be spraying it with water. You do need to try to keep the cut hole as clear as possible from granite sludge. If it becomes too clogged the core drill will fail to turn. Raising the cutter and using plenty of water helps. A could way to tell is to watch the sludge that is coming out. If it is really thick like English mustard, you are not using enough water. Clear water and you are probably using too much water than is really needed. Somewhere around 30-50% of the two is the sweet spot where you minimise the risk of the bit blogging up and you don't use so much water than you have to get your waders out. I went through about 5 cheap squirty bottles because the trigger eventually wears out. You reduce the amount of water you need if you can aim it directly down the hole. Another way to tell, is that if your core drill is getting hot enough that you only just touch it, you are not cooling it down fast enough. The core drill should only get slightly warm really.
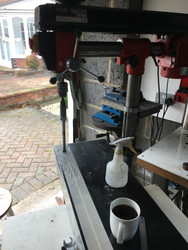
This was a staged picture just to show it setup up ready to drill a hole, next to a core that had almost come out in one piece.
It is not always possible to get the cores out in one full piece. Sometimes if the core drill gets a little blocked or whatever, it can break off. In this state, it is actually quite a brittle part of granite. It is also much easier to break off the cores prematurely if you are using a handdrill. The drill can slip, or fatigue causes you to change angle a little too much and the pressure on the granite core causes it to snap off.
For getting broken pieces of core out of the bottom, I will leave that up to you to find a way that works best for you. haha. It fun and really annoying sometimes when you get a piece that seems to fight back.
Please feel free to leave any questions, comments or feedback on this build diary blog.
Originally Uploaded On: 01/03/2022
Last Updated On: 01/03/2022
Estimated Date Period: : 01/11/2020
This is a privately funded project that frequently sees shortage of funds delaying progress, If you are enjoying this build diary and would like to contribute to the completion of this project and all the future guides and video journeys it would be gratefully received and spent directly on this project. Donate through PayPalMe Here...
SUBSCRIBE TO OUR BUILD BLOG
Recieve our latest blog posts, build diary updates, weekly releases, offers, guides and more.
THIS BUILD DIARY IS ONLY HOSTED ONLINE BY EMG PRECISION LTD. IT IS A PRIVATE HOBBY PROJECT BY MYSELF, JONATHAN GEE. THIS PROJECT BLOG IS ONLY A DIARY OF EVENTS WITH SOME IDEAS FOR HOW I FELT THE PROCESS WENT WITH SOME TECHNIQUES I FOUND USEFUL. THIS IS NOT AT ALL AN OFFICIAL GUIDE OF HOW TO DO THINGS AND YOU SHOULD SEEK PROFESSIONAL ADVICE FROM COMPETENT PERSONS AND CONDUCT RISK ASSESSMENTS BEFORE UNDERTAKING ANY OF THE TASKS SHOWN IN THIS PROJECT BLOG DIARY.


 GBP
GBP US Dollar
 Euro
Euro
 Norwegian Krone
 Canadian Dollar
 Bulgarian Lev
 Polish Zloty
 United Arab Emirates Dirham
 Australian Dollar
 Swiss Franc
 New Zealand Dollar
 Russian Ruble


